 SmartHomeTricks
Expose the date of Proxmox and Synology backups in Home Assistant
One of the most important aspects of managing a smart home is ensuring service continuity and the fastest possible failure recovery in case of a component malfunction. In this scenario, periodic backups of the involved systems become critically important. In my specific case, I have adopted this strategy (there are others that are better, more comprehensive, and more reliable, but the principle of this tutorial applies in any case):
- Every Sunday night, I have scheduled — using Proxmox — the backup of all LXC containers and Virtual Machines on my Proxmox VE server to a network share on my Synology NAS. (I could optimize this process by using Proxmox Backup Server to leverage incremental backups and reduce NAS space usage.)
- Every Sunday night, three hours after the Proxmox backup, I have scheduled a backup of all the content on my Synology NAS to S3 cloud storage (using the NAS utility Hyper Backup).
- Every morning, I have scheduled the backup of configuration files from several servers (e.g., Frigate, Homepage, Proxmox VE itself, Home Assistant, Node-RED, Zigbee2MQTT, etc.) to a network share on the NAS using Synology’s Active Backup for Business utility. This provides a more frequent backup than the weekly full VM/LXC backup, allows to restore individual files, and supports versioning. For services running on Proxmox, this need might be useless If Proxmox Backup Server is used.
What’s missing in this scenario is a structured feedback mechanism. Sure, I could configure email notifications with the backup results (or only in case of errors), but instead, I preferred to expose this information in Home Assistant, allowing me to view it on a Lovelace dashboard or use it as a trigger for other automations.
Step 1: Use a centralized notification service
Both Proxmox and Synology DSM supports Gotify as a notification service. If you don’t need both Proxmox and Synology, never mind: I used the same strategy for both but you can configure only the one that you need, skipping the part you’re not interested on.
Install and configure Gotify:
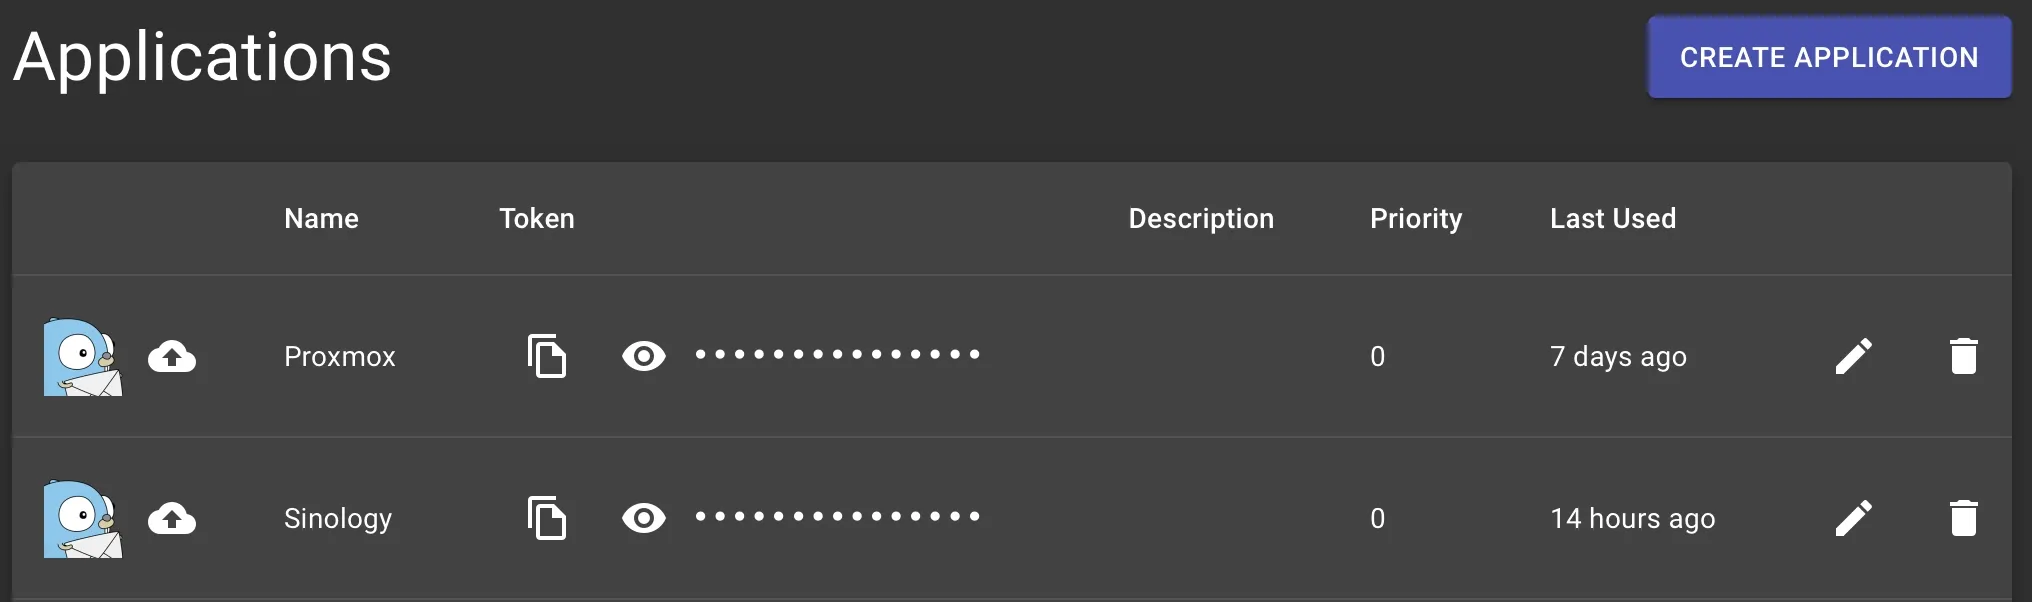
Please refer to Gotify’s official documentation for installing and configuring. I installed it in a Proxmox LXC by using the helper script provided by Community-Scripts. Once installed the setup is really simple: under Apps menù create an application and copy the token you will use to configure It; repeat for each application you need (in my case both Proxmox and Synology)
Configure Proxmox to use Gotify
To configure Gotify as a notification service in Proxmox, you have to select Notifications menu at Datacenter level, then simply add a line for Gotify specifiyng the IP address of Gotify server and the token copied from the picture above.
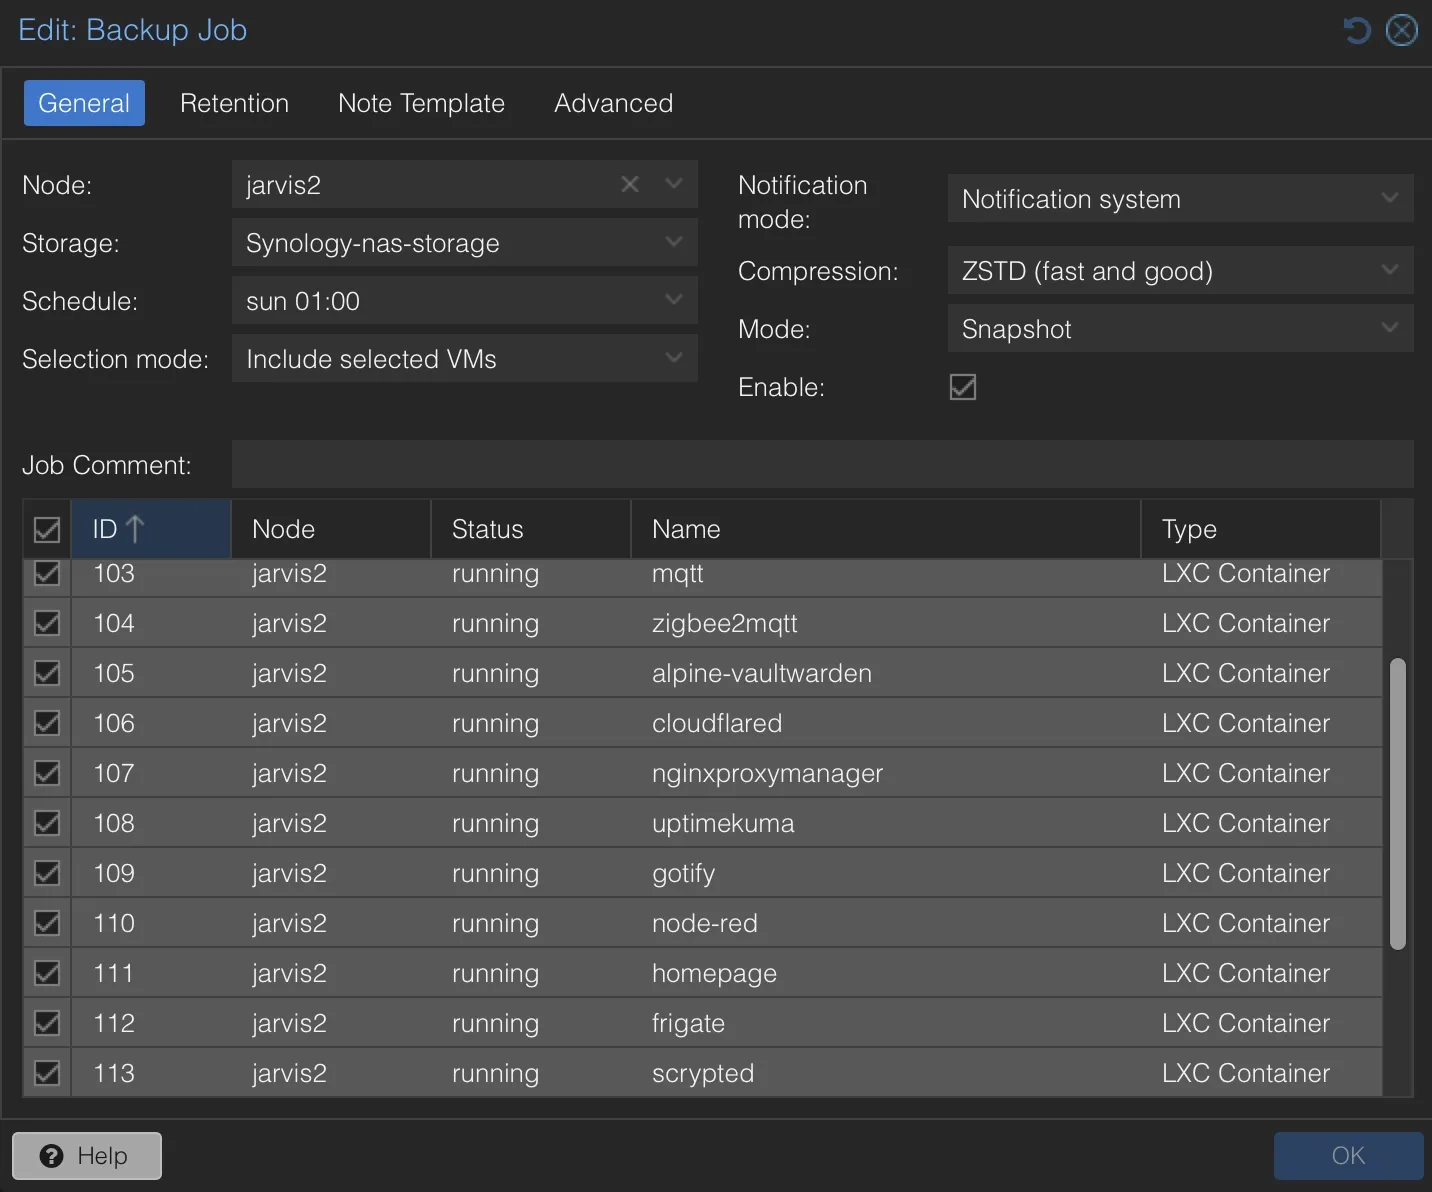
After that you have to modify the scheduled Backup job and specify Notification system as notification mode like in the following picture:
Configure Synology DSM to use Gotify as notification service
Configure a notification service in Synology DSM is quite more complex than in Proxmox: I suggest you to find a proper guide or the official documentation, since the procedure might change in the future and this page might not be updated.
By the way, there are a few steps to complete:
1. Configure a specific rule
You can highly customize each notification, so I defined a new Webhook Rule that only returns events of the “Critical” type, except for the apps I am interested in: Active Backup for Business and Hyper Backup. For these, I requested to receive notifications even for “Information” events when a backup is completed.
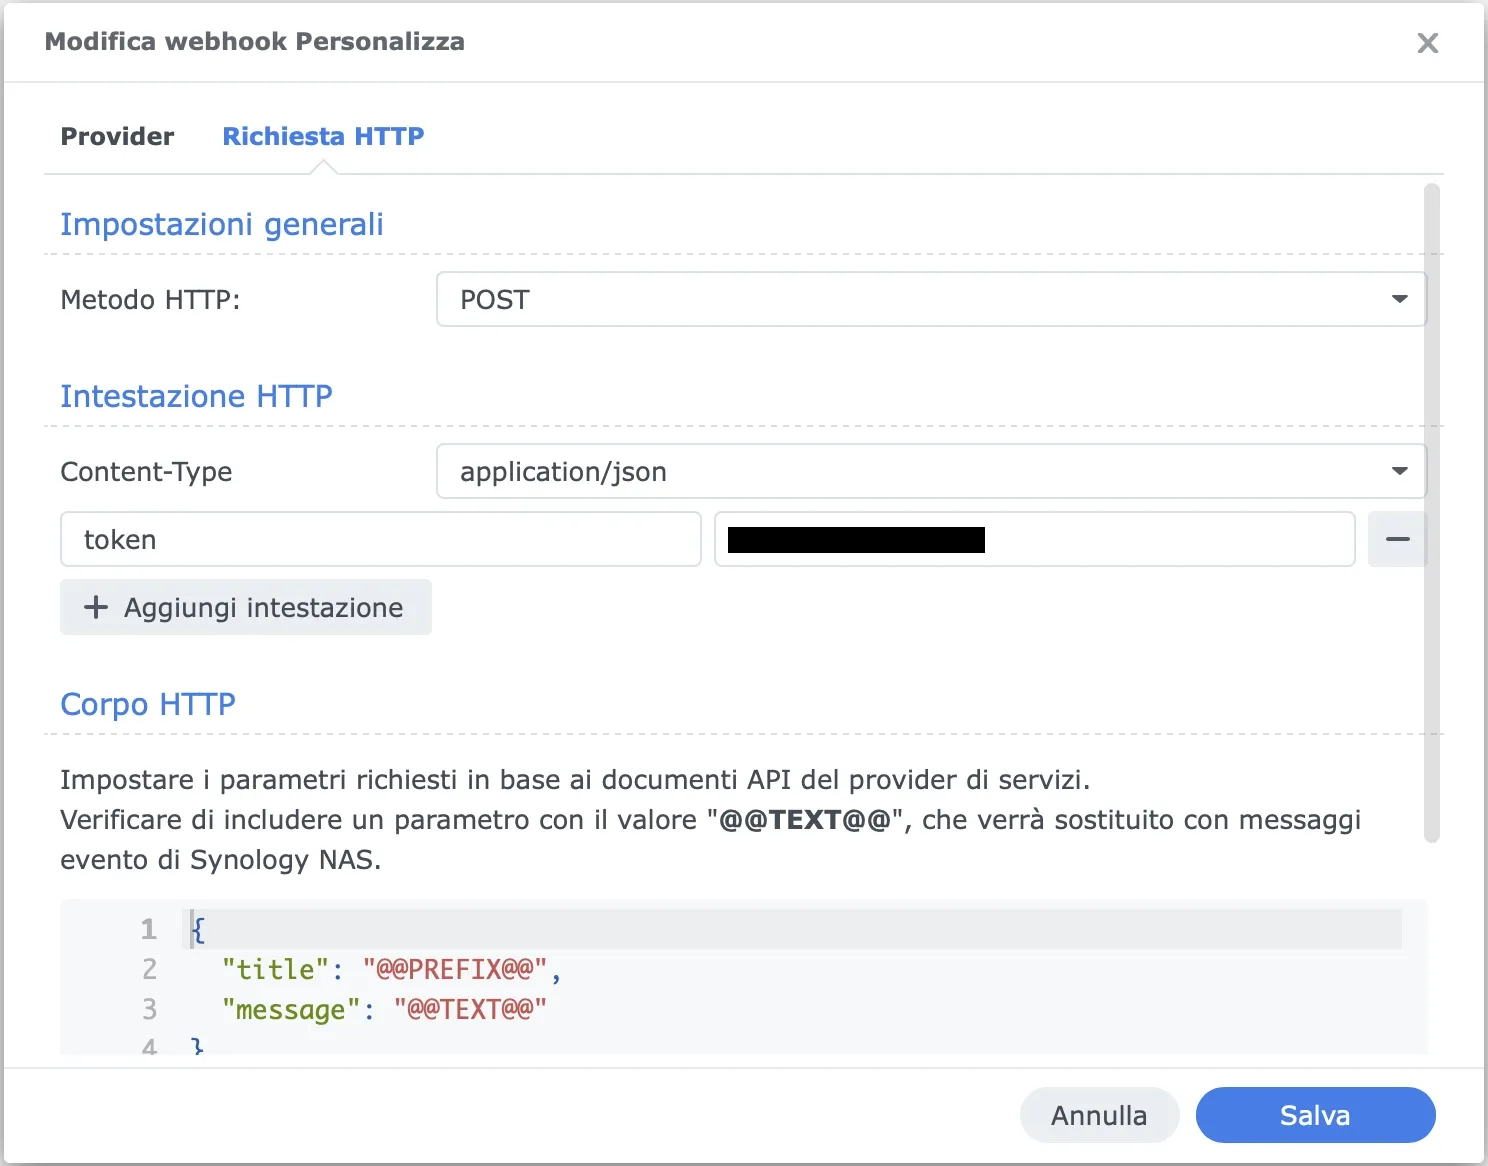
2. Configure new Webhook
This is the most important part: be sure to replace the [gotify_ip] and [generated_token_for_Synology_app] with the IP address of Gotify server and the token copied from picture above for Synology App. If something doesn’t work, check this part 😉
- Provider:
- Provider name:
Gotify - Rule:
[the name of the webhook rule created before] - Subject:
[you can leave the default value] - Webhook URL:
[http://[gotify_ip]/message?token=[generated_token_for_Synology_app]
- Provider name:
- HTTP Request:
- HTTP Method:
POST - Content-Type:
application/json- parameter:
token - value:
[generated_token_for_Synology_app]
- parameter:
- HTTP Body:
{ "title": "@@PREFIX@@", "message": "@@TEXT@@" }
- HTTP Method:
With both Proxmox and Synology, you can send a test message; if everything worked correctly, you should find a copy of the sent message under each application in the Gotify dashboard.
Step 2: Install and configure a MQTT Broker
MQTT is the most commonly used messaging protocol for the Internet of Things (IoT); It operates on a publish-subscribe model where devices (clients) communicate by publishing messages to specific topics or subscribing to receive messages from them. A central broker manages message routing, ensuring published data is delivered only to clients subscribed to the relevant topics.
Since we will use MQTT to publish last backup date to Home Assistant, you need a MQTT broker (such as Mosquitto) already up&running. If not, you could install and configure Eclipse Mosquitto as a standalone service in a Proxmox LXC (again you can use the helper script provided by Community-Scripts) or directly from Home Assistant via the official Add-On.
Once installed, take note of the mqtt_broker_address and port (usually 1883), and of the choosen username and password.
Step 3: Install and configure Node-RED
Node-RED is a flow-based development tool for wiring together hardware devices, APIs, and online services using a browser-based visual editor. It enables users to create and deploy automation workflows with ease, leveraging a wide range of built-in nodes and community-contributed extensions. It allows users to write complex automation with ease. As with MQTT, it can be installed in a Proxmox LXC container through a community script, rather than directly in Home Assistant through an addon.For further information pleas refer to Node-RED official site.
Step 4: Examine the logs, extract the relevant ones, and convert them into MQTT messages with Node-RED.
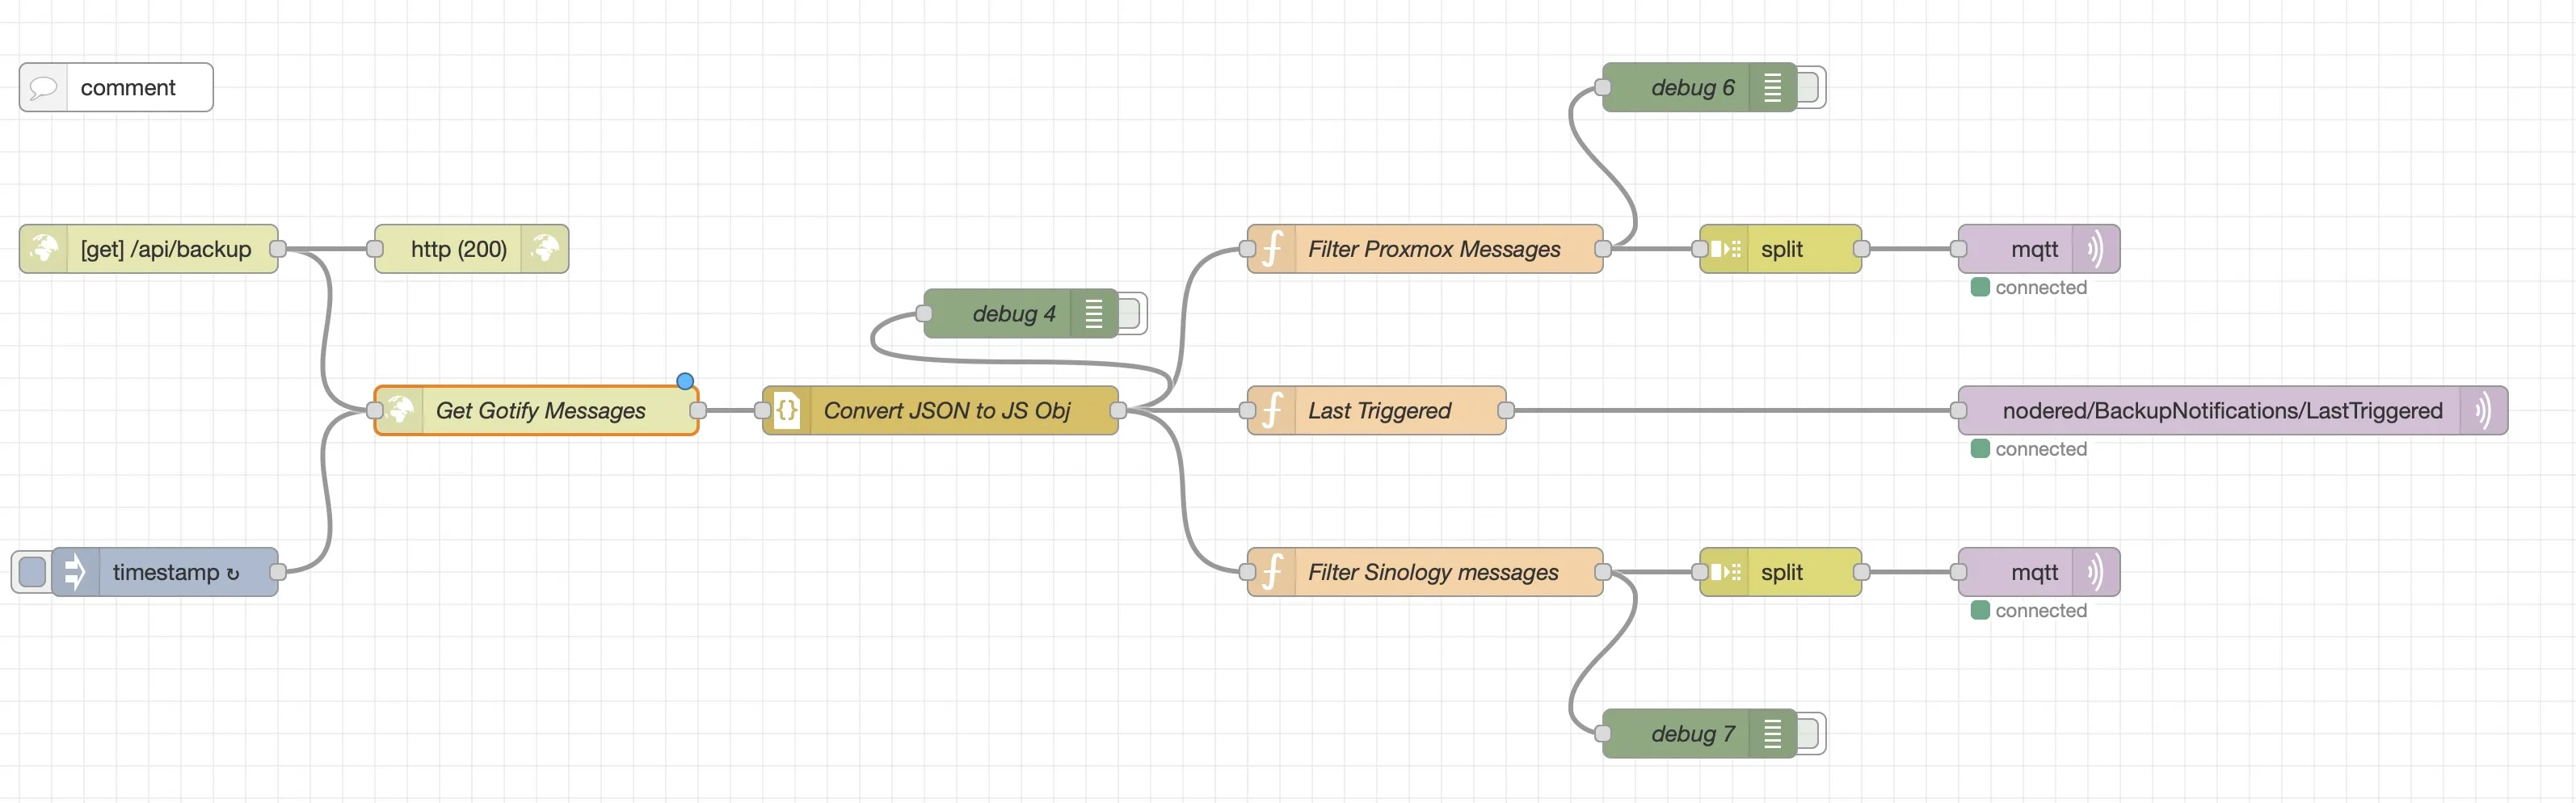
This Node-RED flow is designed to handle backup notifications from Gotify, filter and process relevant messages, and forward the results to MQTT topics for monitoring. It retrieves backup information from two services (Proxmox and Synology) and formats the data to be published to an MQTT broker. The processed backup status sent to MQTT topics can be easily integrated with other home automation systems or monitoring dashboards (like Home Assistant, Homey, OpenHab, …).
How to Use
Configuration Steps
-
Import Flow:
- Import the flow into Node-RED using the Gotify Backup Notifications JSON provided
-
MQTT Broker Configuration:
- Replace
mqtt_broker_addressin the MQTT nodes with the address of your MQTT broker.
- Replace
-
Modify the Flow:
- Modify the Flow accordingly to your specific needs: you can modify MQTT topics, collect more data, change the schedule, remove Proxmox or Synology if you need only one of them, and so on.
-
Deploy the Flow:
- After importing the flow, click the Deploy button to start the flow. You can trigger it by calling the exposed API (since it’s a GET method you can also call it from a broswer tab). If everything works, with a tool like
MQTT Exploreryou will be able to see the published messages.
- After importing the flow, click the Deploy button to start the flow. You can trigger it by calling the exposed API (since it’s a GET method you can also call it from a broswer tab). If everything works, with a tool like
Flow Components
1. HTTP Request to Gotify Server
- Node:
Get Gotify Messages - Trigger: This node is triggered by an HTTP request initiated by a scheduled cron job (daily at 5:30 AM). It pulls the latest backup messages from a specified Gotify server endpoint: since also Node-RED has to access Gotify - not for publishing notifications like Proxmox and Synology - but for reading the published ones, you need con configure another Gotify App and take note of the relative API token.
It can also be triggered on demand by calling the Node-RED GET API
http://[nodered_ip:port]:/api/backup]- Replace
[nodered_ip:port]with the actual Node-RED server address and port (default is1880).
- Replace
- Endpoint:
http://[gotify_address]/message?token=[your_token_goes_here]- Replace
[gotify_address]and[your_token_goes_here]with the actual Gotify server address and token.
- Replace
2. Parsing and Filtering Messages
- Node:
Convert JSON to JS Obj - Function Nodes:
Filter Proxmox Messages,Filter Synology messages - Processing Logic:
- Converts the JSON response from Gotify into JavaScript objects.
- Filters messages related to Proxmox and Synology backup statuses by looking for keywords and matching app IDs.
- In my setup, Proxmox was the first app I configured in Gotify, so it has
appid=1, while Synology the second one (appid=2): replace the actual Id matching your specific configuration (see comments in the flow nodes). - If Proxmox or Synology will change the notification format in the future, you have to modify this scrip script accordingly.
Proxmox Backup Filtering:
- For each Proxmox message, it checks the backup status of all the listed LXC/VM like
adguard,mqtt,docker, etc. that you can configure by your needs. You have to use the same LXC/VM name as it appears in Proxmox VE node. - It then creates MQTT messages with the last backup date (if present) and publishes them to the topic
nodered/BackupNotifications/Proxmox/{service_name}.
Synology Backup Filtering:
- It filters messages related to Active Backup for Business jobs for services like
Home Assistant,Zigbee2MQTT,Frigate, etc. - Creates MQTT messages for each service with the last backup date (if present) and sends them to
nodered/BackupNotifications/Synology/{service_name}.
3. MQTT Out Nodes
- Node:
mqtt out - Broker: Uses the configured MQTT broker (
mqtt_broker_address). - Functionality: For each backup status received, the flow sends messages to the appropriate MQTT topics (
nodered/BackupNotifications/Proxmox/{service_name}andnodered/BackupNotifications/Synology/{service_name}). The MQTT topics contain the backup status and the last successful backup date. Additionally, the flow sends a message about the “Last Triggered” backup to the topicnodered/BackupNotifications/LastTriggered.
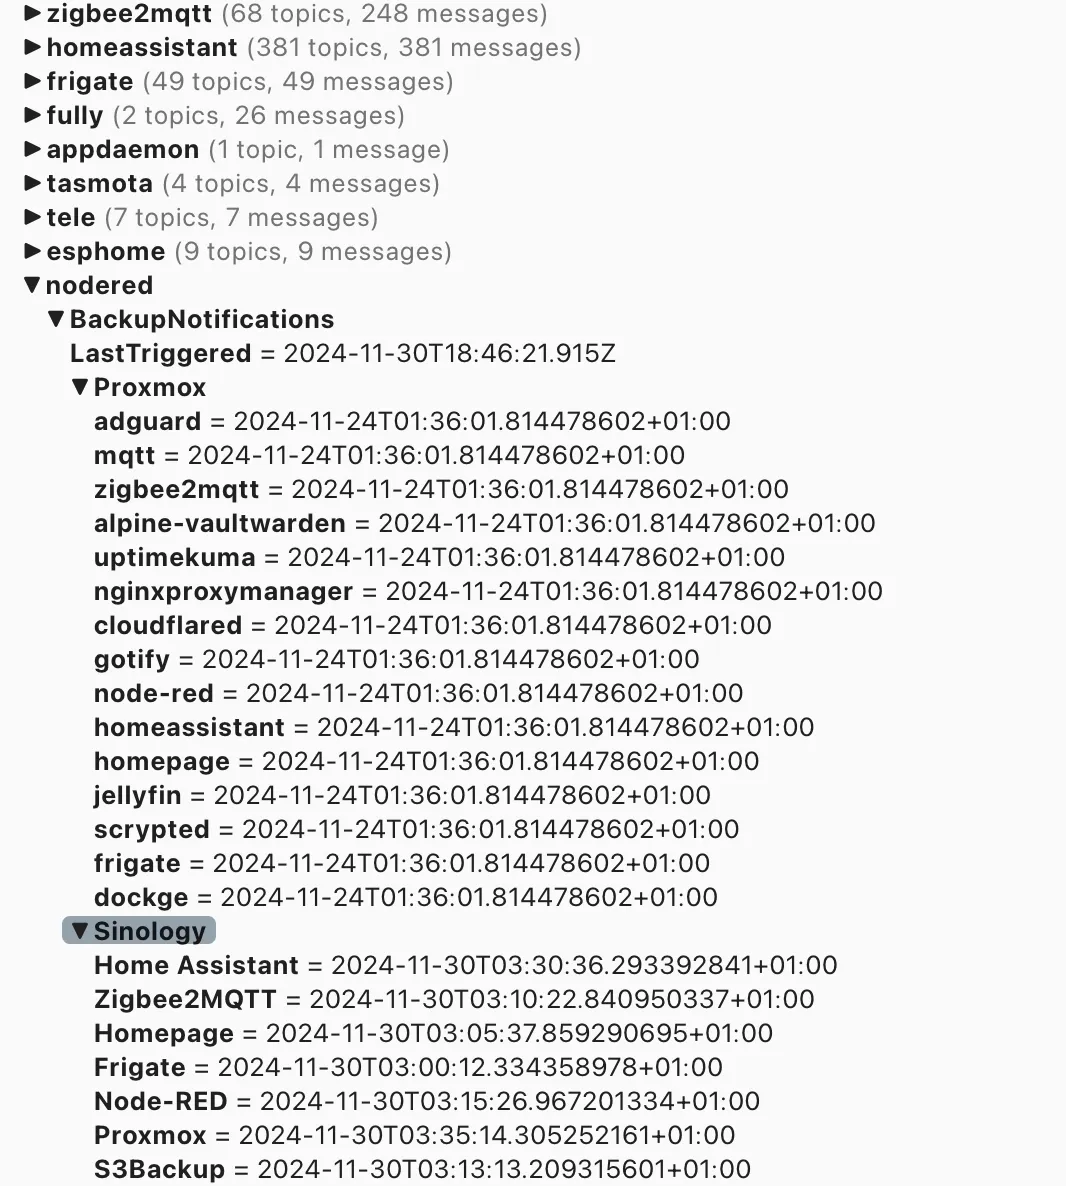
Example MQTT Topics
nodered/BackupNotifications/Proxmox/{service_name}nodered/BackupNotifications/Synology/{service_name}nodered/BackupNotifications/LastTriggered
These topics will contain the status of each service’s backup and the timestamp of the last backup triggered.
Step 5: Read the data in Home Assistant
Configure sensors:
in configuration.yaml add or modify the mqtt section by defining all the sensor you need with the relative MQTT Topic:
mqtt:
  - sensor:
    - name: "Last Home Assistant Config Backup"
      state_topic: "nodered/BackupNotifications/Synology/Home Assistant"
      device_class: timestamp

    - name: "Last NAS S3 Backup"
      state_topic: "nodered/BackupNotifications/Synology/S3Backup"
      device_class: timestamp

    - name: "Last ADGuard Backup"
      state_topic: "nodered/BackupNotifications/Proxmox/adguard"
      device_class: timestamp
    - name: "Last Cloudflared Backup"
      state_topic: "nodered/BackupNotifications/Proxmox/cloudflared"
      device_class: timestamp
    - name: "Last MQTT Backup"
      state_topic: "nodered/BackupNotifications/Proxmox/mqtt"
      device_class: timestamp
    - name: "Last Zigbee2MQTT Backup"
      state_topic: "nodered/BackupNotifications/Proxmox/zigbee2mqtt"
      device_class: timestamp
    - name: "Last Home Assistant Backup"
      state_topic: "nodered/BackupNotifications/Proxmox/homeassistant"
      device_class: timestamp

    - name: "Backup Notifications Last Triggered"
      state_topic: "nodered/BackupNotifications/LastTriggered"
      device_class: timestamp
Then, if you want to have only one sensor for notifying if a backup failed or is missing, just define a group with all the sensors you need and a template sensor:
group:
  - pxmxbackups:
    name: Proxmox Backups
    icon: mdi:backup-restore
    entities:
      - sensor.last_adguard_backup
      - sensor.last_cloudflared_backup
      - sensor.last_mqtt_backup
      - sensor.last_zigbee2mqtt_backup
      - sensor.last_home_assistant_backup


template:
  - sensor:
    - unique_id: "ba18fae6-b722-4264-b654-5468ae60c02c"
      name: "Missing Proxmox Backups"
      icon: mdi:backup-restore
      state: >
        {% set outdated_sensors = namespace(sensors=[]) %}
        {% for sensor in states.sensor|selectattr('entity_id', 'in', state_attr('group.pxmxbackups', 'entity_id')) %}
          {% if sensor.state in ['unavailable','unknown','none'] or now() - sensor.state | as_datetime | as_local >= timedelta(days=7) %}
              {% set outdated_sensors.sensors = outdated_sensors.sensors + [dict(name = sensor.name | replace('Last ', '') | replace(' Backup', ''))]| map(attribute='name') | list %}
          {% endif %}
        {% endfor %}
        {% if outdated_sensors.sensors|length == 0 %}
           All backups are OK
        {% elif outdated_sensors.sensors|length == 1 %}
          {{ outdated_sensors.sensors[0] }} doesn't have recent backups
        {% else %}
          {{ outdated_sensors.sensors[:-1]|join(', ') }}{{ ', ' if outdated_sensors.sensors|length > 2 else ' ' }} e {{ outdated_sensors.sensors[-1] }}{{ ' don't have recent backups.' if outdated_sensors.sensors|length > 2 else ' aren't recent.'}}
        {% endif %}
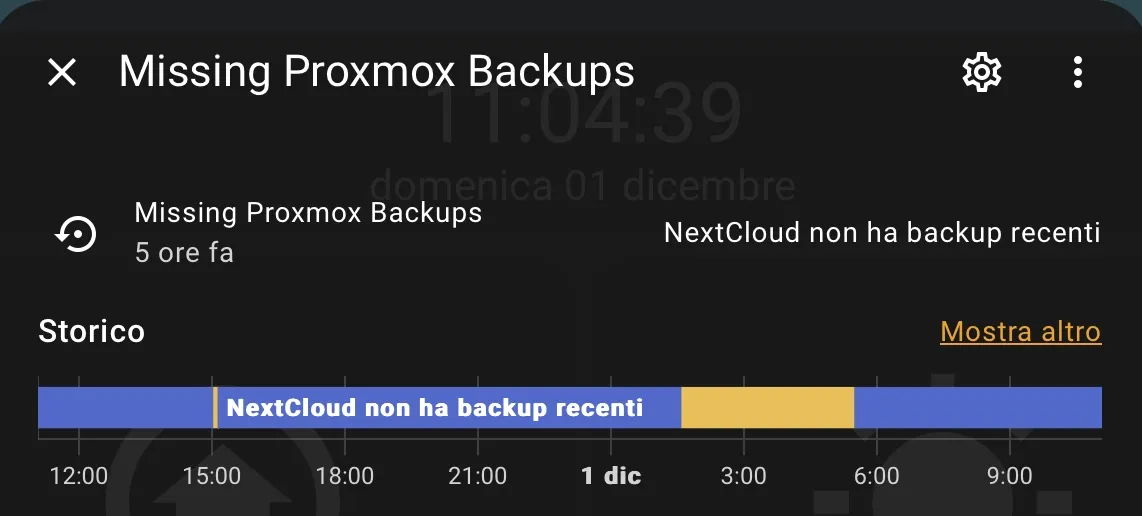
Show a chip on a Lovelace dashboard if some backup are missing:
In this example, if there is a missing backup, I show a Mushroom Chip Card, like for low battery alarm and other warnings. You can use the card you prefer: please refer to Home Assistant Lovelace documentation for further assistance.
- type: custom:mushroom-chips-card
  chips:
    - type: conditional
        conditions:
        - entity: sensor.missing_proxmox_backups
          state_not: All backups are OK
        chip:
            type: template
            icon: mdi:backup-restore
            icon_color: red
            tap_action:
                action: more-info
            entity: sensor.missing_proxmox_backups
Force the verification of backups:
If you want to manually trigger the Node-RED flow, you have first to define a rest_command in configuration.yaml (replace [nodered_ip:port] with the actual Node-RED server address and port; default is 1880)
rest_command:
  check_proxmox_backup:
    url: "http://[nodered_ip:port]/api/backup"
then call it in an action card in lovelace: I used a Mushroom entity card which also display the backup_notifications_last_triggered sensor.
- type: custom:mushroom-entity-card
  entity: sensor.backup_notifications_last_triggered
  icon: mdi:backup-restore
  name: Check Proxmox & Config Backup
  action: call-service
  service: rest_command.check_proxmox_backup
  target: {}