 SmartHomeTricks
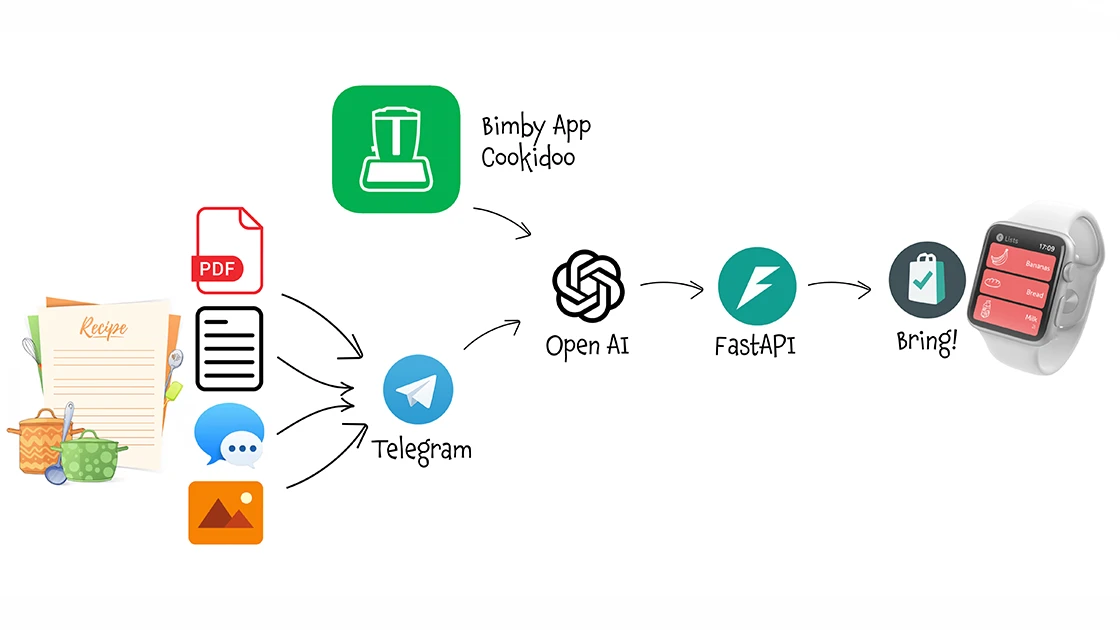
My wife and I use Bring!, a shared grocery list app with iOS and Apple Watch support, to manage our everyday shopping. Thanks to the Apple Watch app, when we’re at the supermarket, we can simply glance at our wrist to see the Bring! items, and a single tap removes what we’ve put in the cart.
I wrote about the AI Shopping Assistant almost a year ago. That V1 workflow let us share a recipe via Telegram (PDF, image, link, …), and the AI would extract the ingredients to update our Bring! shopping list. The workflow used Home Assistant as a proxy between n8n and Bring!, leveraging the HA Bring integration. This year we bought a Thermomix robot (Bimby in Italy): the Cookidoo app (Thermomix’s recipe and meal-planning service) also provides its own built-in shopping list… and it’s really useful for Cookidoo recipes, but we still prefer the Bring! app for everyday use. So I needed something to orchestrate both shopping lists… and since I didn’t really use the shopping list within Home Assistant, I decided to build a custom solution to integrate them, without the need for Home Assistant this time. Since I had another AI shopping assistant in place, why not extend it?
How It Works
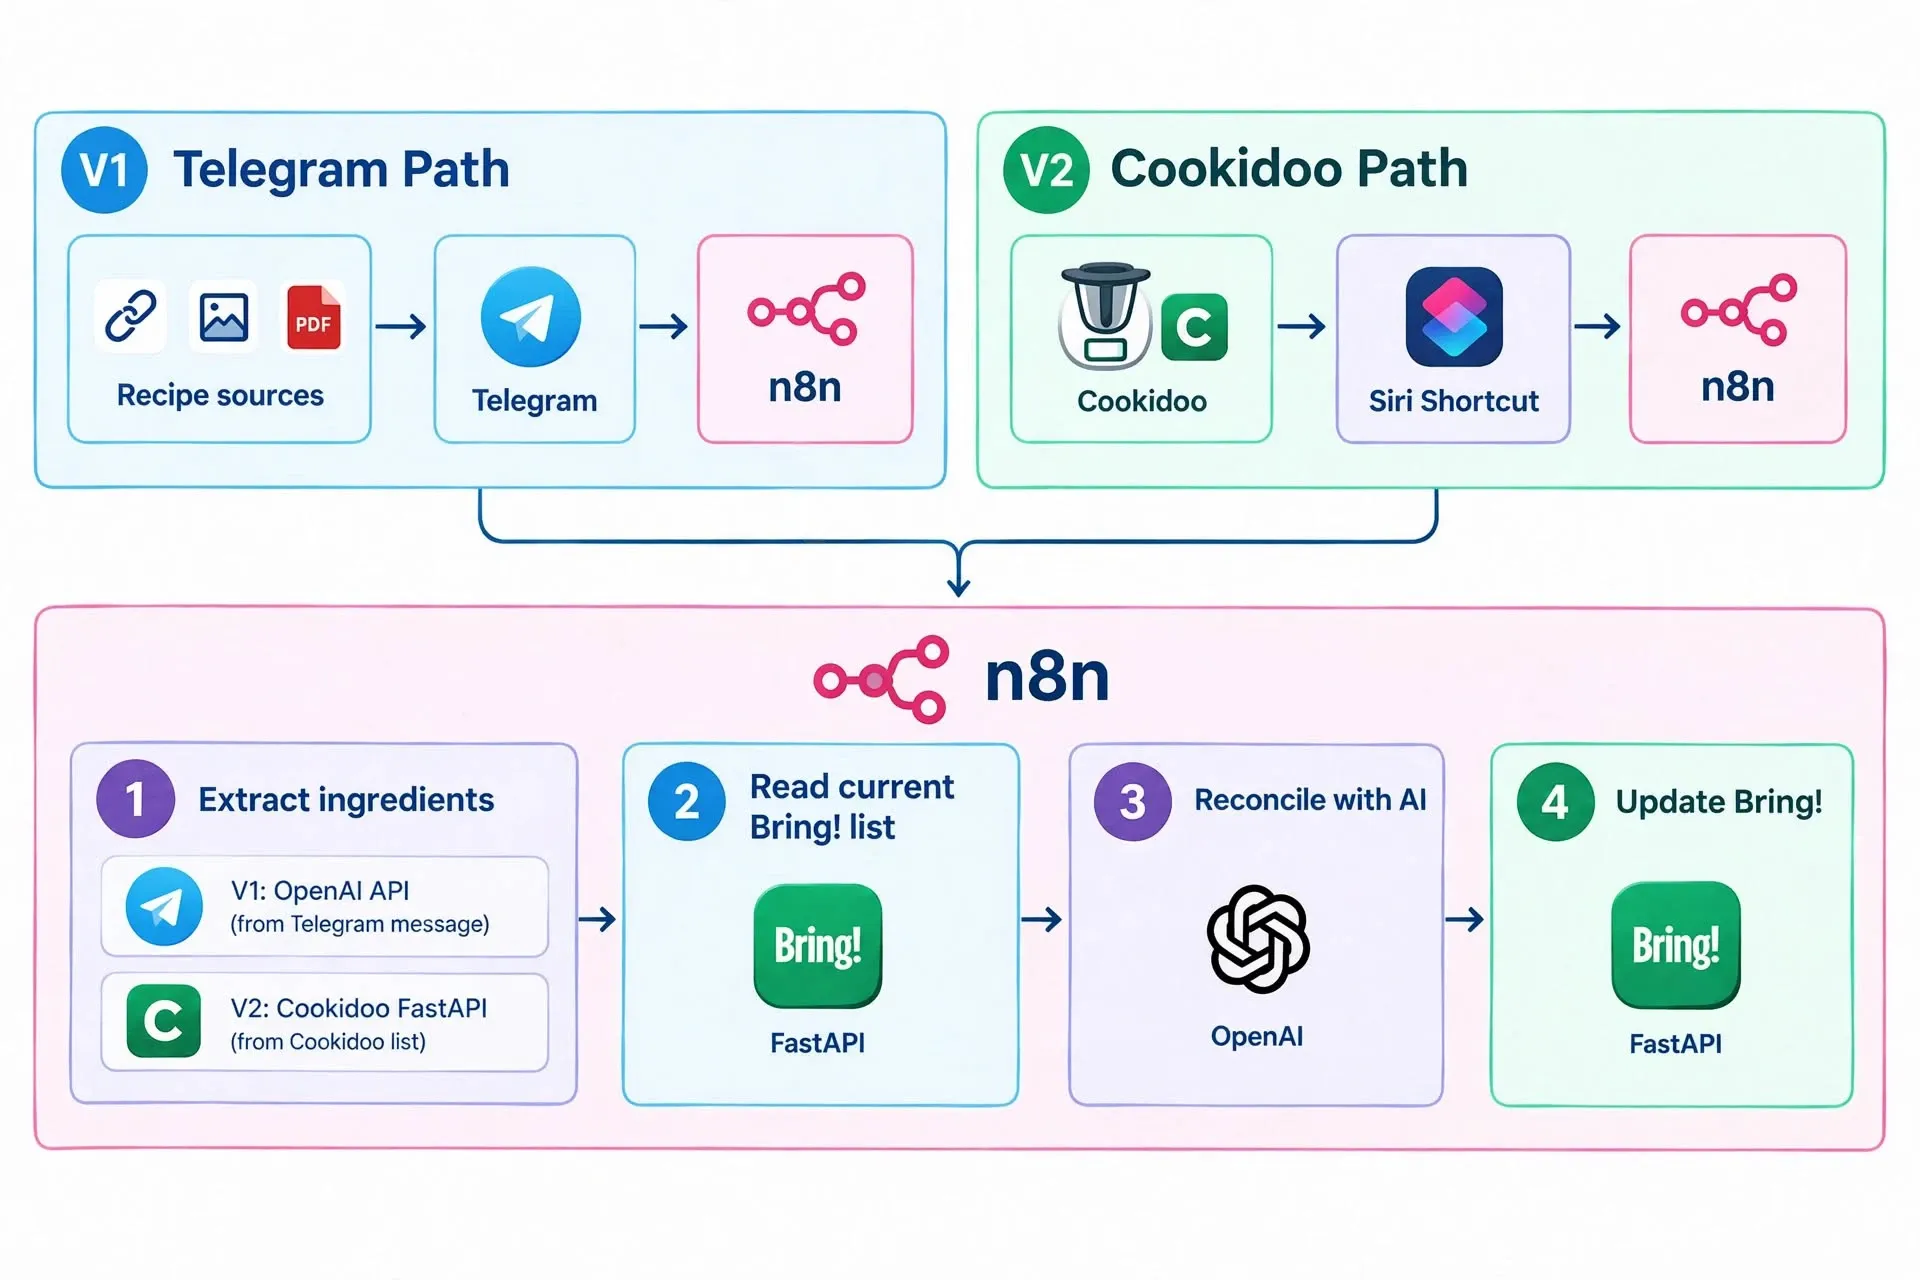
At a high level, this workflow handles two trigger paths:
- Telegram path — the original V1 workflow: when we find a recipe online (the format doesn’t matter: it could be a link, image, or PDF), we share it on Telegram and the AI extracts the ingredients, updating our Bring! shopping list.
- Cookidoo path — the new V2 workflow: the Bimby/Cookidoo app lets you choose a recipe directly from the robot or the iPhone app (the one we prefer), add it to the in-app shopping list… and “magically” it ends up in the Bring! app.
As for the Telegram part, the AI reconciles the two lists, so if an ingredient is already present in Bring!, its quantity is updated instead of being duplicated. If you don’t need to share recipes via Telegram, you can skip the Telegram part and just use the Cookidoo path.
Why not use Home Assistant anymore?
The HA Cookidoo integration relies on polling to fetch the shopping list — not ideal when my wife adds a recipe while I’m already at the supermarket, since updates only appear after the next poll cycle. But even ignoring that delay, the HA integration alone wouldn’t be enough: it syncs Cookidoo’s shopping list into HA, but I still need a reconciliation step that merges Cookidoo items with the existing Bring! list to avoid duplicates and combine quantities. In short, I needed something that orchestrates the whole flow — not just a bridge between two apps.
My solution was to trigger the Cookidoo App closing with a Siri Shortcut, which calls a webhook in n8n that fetches the Cookidoo shopping list and pushes it to Bring!.
Since I didn’t leverage HA integrations anymore, I wrote a proper FastAPI service that wraps both the Cookidoo and Bring! APIs. The FastAPI service exposes simple endpoints to fetch the Cookidoo list and push items to Bring!. The orchestration is always handled by n8n… so no Home Assistant needed.
The Cookidoo → Bring! path can be summarized as follows:
- The user adds a recipe to the Cookidoo shopping list (via the Thermomix app or the robot itself)
- The user triggers the Siri Shortcut: automatically when the Thermomix app on iPhone is closed, or manually from the Shortcuts app or via Siri voice command when working from the robot
- The Shortcut calls the n8n webhook, which fetches the Cookidoo shopping list via a FastAPI endpoint, reconciles it with the current Bring! list via AI, and pushes the new items to Bring! thanks to another FastAPI endpoint
- The FastAPI backend runs on two ports of an LXC on Proxmox:
- Port 8001 — Cookidoo API (get list, clear list)
- Port 8002 — Bring! API (get list, add item, update item)
Step 1: Create Telegram Bot
I kept the Telegram bot from V1 — it’s still useful for debugging and for the occasional recipe-share from a friend. If you don’t already have a Telegram bot, set it up as described in the AI Shopping Assistant article.
Set up the Telegram bot
Creating a Telegram Bot is really simple:
- Open a chat with the user @BotFather and type
/newbot - Follow the instructions: you will be asked to define a Bot name and a username
- At the end, BotFather will show you the HTTP API Token (
[Telegram_Token]): save it securely, we’ll use it later.
Step 2: Set up the FastAPI backend
The service runs on two ports that can be on the same LXC where n8n runs or on a dedicated LXC. The two ports are used to separate the two APIs on the same endpoint, but you can also run them on two different LXCs if you prefer:
| Port | Purpose | Endpoints |
|---|---|---|
| 8001 | Cookidoo API | GET /shopping/ingredients, DELETE /shopping/clear |
| 8002 | Bring! API | GET /lists/{listId}, POST /lists/{listId}/items, POST /lists/{listId}/items/{uuid}/update |
Both services are available for download:
Create the LXC
I decided to setup a dedicated Proxmox LXC for all the FastAPI servicesthrough the Proxmox web interface (Datacenter → Create CT).
Give it 1 CPU, 512 MB RAM, 8 GB root disk, a static IP on your network and a Debian 12 operating system.
Install Python and dependencies
SSH into the LXC and install Python + pip:
apt update && apt upgrade -y
apt install -y python3 python3-pip python3-venv
Deploy the Cookidoo API service
1. Create the service folder and copy the code
The cookidoo-api service is a single main.py file that wraps the cookidoo-api Python package.
mkdir -p /opt/cookidoo-api
curl -o /opt/cookidoo-api/main.py https://smarthometricks.sirri.it/downloads/cookidoo-api.py
The complete file is available here: cookidoo-api.py
The excerpt below shows the file structure — imports, configuration, session cache pattern, and all available endpoints:
# ---------------------------------------------------------------------------
# Imports
# ---------------------------------------------------------------------------
from fastapi import FastAPI, HTTPException, BackgroundTasks
from pydantic import BaseModel
from typing import Optional
import asyncio, aiohttp, os, requests, datetime
from pathlib import Path
from cookidoo_api import (Cookidoo, CookidooConfig,
    CookidooLocalizationConfig, CookidooParseException,
    CookidooAuthException, CookidooRequestException, CookidooException)

app = FastAPI(title="Cookidoo API", version="1.0.0")

# ---------------------------------------------------------------------------
# Configuration
# ---------------------------------------------------------------------------
COOKIDOO_EMAIL    = os.environ.get("COOKIDOO_EMAIL", "[email protected]")
COOKIDOO_PASSWORD = os.environ.get("COOKIDOO_PASSWORD", "yourpassword")
COOKIE_FILE       = Path(os.environ.get("COOKIE_FILE", "/opt/cookidoo-api/.cookidoo_cookies"))

LOCALIZATION = CookidooLocalizationConfig(
    country_code="it", language="it-IT", url="https://cookidoo.it/foundation/it-IT",
)

# ---------------------------------------------------------------------------
# Session cache — one authenticated session reused across requests
# ---------------------------------------------------------------------------
_session_cache: dict = {"api": None, "session": None, "jar": None}

async def _get_api() -> Cookidoo:      # login + cookie persistence + cache
async def _reset_session():              # clear cache + delete cookies

# ---------------------------------------------------------------------------
# Pydantic models
# ---------------------------------------------------------------------------
class RecipeRequest(BaseModel):          recipe_id, webhook_url?, reference_id?
class RecipesRequest(BaseModel):        recipe_ids, webhook_url?, reference_id?
class AdditionalItemsRequest(BaseModel): names, webhook_url?, reference_id?
class ServingRequest(BaseModel):         recipe_id, serving_size=4, webhook_url?, reference_id?
class CalendarRequest(BaseModel):        day, recipe_ids, webhook_url?, reference_id?

# ---------------------------------------------------------------------------
# Routes
# ---------------------------------------------------------------------------
# Auth
POST /auth/refresh                     force new login
# User
GET  /user/info                        account info
GET  /user/subscription                subscription details
# Shopping list
GET  /shopping/ingredients             ingredient items from recipes
GET  /shopping/additional-items        manually added items
GET  /shopping/recipes                 recipes on the list
POST /shopping/add-recipe              add recipe ingredients
POST /shopping/add-recipes             add multiple recipes
POST /shopping/add-items               add free-text items
DELETE /shopping/clear                 clear entire list
# Recipes
POST /recipes/details                  recipe details by ID
POST /recipes/add-custom               copy public recipe to account
# Collections
GET  /collections/custom               custom collections
GET  /collections/managed              official collections
# Calendar
POST /calendar/add                     add recipes to calendar day
GET  /calendar/week                    recipes planned for week
# Debug / Health
GET  /debug/collections-raw            raw API response (debug)
GET  /health                           session_active + cookie_file_exists
NOTE
The LOCALIZATION is set to Italy. Change country_code, language and url if you’re in a different country.
2. Set up a virtual environment
python3 -m venv /opt/cookidoo-api/venv
/opt/cookidoo-api/venv/bin/pip install cookidoo-api fastapi uvicorn aiohttp requests pydantic --break-system-packages
NOTE
--break-system-packages is required on Debian 12+ due to PEP 668. Using a venv avoids conflicts with system packages.
3. Create the systemd service
Create /etc/systemd/system/cookidoo-api.service:
[Unit]
Description=Cookidoo API Service
After=network.target

[Service]
Type=simple
User=root
WorkingDirectory=/opt/cookidoo-api
ExecStart=/opt/cookidoo-api/venv/bin/uvicorn main:app --host 0.0.0.0 --port 8001
Restart=always
RestartSec=10

[Install]
WantedBy=multi-user.target
systemctl daemon-reload
systemctl enable --now cookidoo-api
4. Verify
curl http://localhost:8001/health
curl http://localhost:8001/
The root endpoint returns the list of all available endpoints.
5. Get your Cookidoo credentials
As you can see in the Configuration section, you need your Cookidoo account email and password. The API uses these to authenticate against the Cookidoo platform. There is no API key — authentication is session-based (cookies), managed automatically by the cookidoo-api library.
IMPORTANT
Credentials are stored in plain text on the LXC file system. Make sure the LXC is secure and not exposed to the internet.
6. Test the endpoints
# Health check
curl http://localhost:8001/health

# Fetch your shopping list
curl -X GET http://localhost:8001/shopping/ingredients

# Force a new login (if auth fails)
curl -X POST http://localhost:8001/auth/refresh
Cookidoo API — Endpoints reference
The Cookidoo API runs on port 8001 and wraps the cookidoo-api Python library.
| Method | Path | Description |
|---|---|---|
GET | / | Returns service status and a list of all available endpoints. |
POST | /auth/refresh | Forces a new login, discarding any cached session. Call this if you get authentication errors. |
GET | /user/info | Returns your Cookidoo account information. |
GET | /user/subscription | Returns your active subscription details. |
GET | /shopping/ingredients | Returns all ingredient items on your shopping list — items added automatically when you add a recipe. Returns {"count": N, "items": [...]}. Each item has name (ingredient) and description (quantity). |
GET | /shopping/additional-items | Returns all manually added items — items you added without a recipe. |
GET | /shopping/recipes | Returns all recipes currently on your shopping list. |
POST | /shopping/add-recipe | Adds a recipe’s ingredients to the shopping list. Body: {"recipe_id": "..."}. |
POST | /shopping/add-recipes | Adds multiple recipes at once. Body: {"recipe_ids": ["...", "..."]}. |
POST | /shopping/add-items | Adds free-text items. Body: {"names": ["item1", "item2"]}. |
DELETE | /shopping/clear | Clears the entire shopping list. This is what the workflow calls after syncing to Cookidoo, to avoid duplicating items on the next run. |
POST | /recipes/details | Gets full recipe details by ID. Body: {"recipe_id": "..."}. |
GET | /health | Returns {"status": "healthy", "session_active": true/false, "cookie_file_exists": true/false}. |
Session and cookies
The service uses a session cache — the first call triggers a login with your credentials, and subsequent calls reuse the same authenticated session. Cookies are persisted to /opt/cookidoo-api/.cookidoo_cookies so the session survives service restarts. If authentication fails, call POST /auth/refresh to force a new login.
Deploy the Bring! API service
1. Create the service folder and copy the code
The bring-api service wraps the bring-api Python package.
mkdir -p /opt/bring-api
curl -o /opt/bring-api/main.py https://smarthometricks.sirri.it/downloads/bring-api.py
The complete file is available here: bring-api.py
The excerpt below shows the file structure — imports, configuration, session cache pattern, and all available endpoints:
# ---------------------------------------------------------------------------
# Imports
# ---------------------------------------------------------------------------
from fastapi import FastAPI, HTTPException, BackgroundTasks
from pydantic import BaseModel
from typing import Optional, Any
import aiohttp, os, requests
from bring_api import Bring, BringItemOperation
from bring_api.exceptions import BringAuthException, BringException, BringRequestException

app = FastAPI(title="Bring! API", version="1.0.0")

# ---------------------------------------------------------------------------
# Configuration
# ---------------------------------------------------------------------------
BRING_EMAIL    = os.environ.get("BRING_EMAIL", "[email protected]")
BRING_PASSWORD = os.environ.get("BRING_PASSWORD", "yourpassword")

# ---------------------------------------------------------------------------
# Session cache
# ---------------------------------------------------------------------------
_session_cache: dict = {"api": None, "session": None}

async def _get_api() -> Bring:          # login + cache
async def _reset_session():              # clear cache

# ---------------------------------------------------------------------------
# Pydantic models
# ---------------------------------------------------------------------------
class AddItemRequest(BaseModel):        item_id, specification="", uuid?, webhook_url?, reference_id?
class BatchAddRequest(BaseModel):        items[], webhook_url?, reference_id?
class ItemActionRequest(BaseModel):      item_id, uuid?, webhook_url?, reference_id?
class UpdateItemRequest(BaseModel):       item_id, specification="", webhook_url?, reference_id?
class NotifyRequest(BaseModel):          notification_type=1, webhook_url?, reference_id?

# ---------------------------------------------------------------------------
# Routes
# ---------------------------------------------------------------------------
GET  /                                 lists all endpoints + notification types
POST /auth/refresh                     force new login
# Lists
GET  /lists                            all shopping lists
GET  /lists/{list_uuid}                items in a list (purchase + recently)
# Items
POST /lists/{list_uuid}/items           add single item
POST /lists/{list_uuid}/items/batch     add multiple items
POST /lists/{list_uuid}/items/{uuid}/update    update quantity
POST /lists/{list_uuid}/items/{uuid}/complete  mark as purchased
POST /lists/{list_uuid}/items/{uuid}/remove    remove item
# Notifications
POST /lists/{list_uuid}/notify          push notification (types 1-4)
# Debug / Health
GET  /debug/list/{list_uuid}           raw API response
GET  /health                           session_active
2. Set up a virtual environment
python3 -m venv /opt/bring-api/venv
/opt/bring-api/venv/bin/pip install bring-api fastapi uvicorn aiohttp requests pydantic --break-system-packages
3. Create the systemd service
Create /etc/systemd/system/bring-api.service:
[Unit]
Description=Bring! API Service
After=network.target

[Service]
Type=simple
User=root
WorkingDirectory=/opt/bring-api
ExecStart=/opt/bring-api/venv/bin/uvicorn main:app --host 0.0.0.0 --port 8002
Restart=always
RestartSec=10

[Install]
WantedBy=multi-user.target
systemctl daemon-reload
systemctl enable --now bring-api
4. Verify
curl http://localhost:8002/
5. Get your Bring! credentials and list UUID
As before, you need your Bring! account email and password. The API authenticates with email/password. To find your list UUID, call:
curl -X GET http://localhost:8002/lists
The response contains all your Bring! lists with their UUIDs:
{
  "count": 1,
  "lists": [
    { "list_uuid": "9e7ab5b3-8e0f-4714-9285-73a01f78a99b", "name": "Spesa", "theme": null }
  ]
}
IMPORTANT
Credentials are stored in plain text on the LXC file system. Make sure the LXC is secure and not exposed to the internet.
6. Test the endpoints
# Health check
curl http://localhost:8002/health

# Get your list UUID
curl -X GET http://localhost:8002/lists

# Fetch list items (replace {listId})
curl -X GET "http://localhost:8002/lists/{listId}?only_purchase=true"

# Add an item
curl -X POST "http://localhost:8002/lists/{listId}/items" \
  -H "Content-Type: application/json" \
  -d '{"item_id": "tomatoes", "specification": "500g"}'

# Update item quantity
curl -X POST "http://localhost:8002/lists/{listId}/items/{itemId}/update" \
  -H "Content-Type: application/json" \
  -d '{"specification": "750g", "item_id": "tomatoes"}'
Bring! API — Endpoints reference
The Bring! API runs on port 8002 and wraps the bring-api Python library.
| Method | Path | Description |
|---|---|---|
GET | / | Returns service status and list of available endpoints. |
POST | /auth/refresh | Forces a new login, discarding the cached session. |
GET | /lists | Returns all your Bring! lists. Each has a list_uuid — needed for all other endpoints. |
GET | /lists/{list_uuid} | Returns all items in a list. purchase = active items; recently = recently purchased. Use ?only_purchase=true to get only active items. |
POST | /lists/{list_uuid}/items | Adds a single item. Body: {"item_id": "tomatoes", "specification": "500g"}. item_id = product name, specification = quantity/unit. |
POST | /lists/{list_uuid}/items/batch | Adds multiple items. Body: {"items": [{"item_id": "...", "specification": "..."}, ...]}. |
POST | /lists/{list_uuid}/items/{uuid}/update | Updates an item’s quantity. The uuid identifies the item. Internally removes the old item and re-adds it with the new specification. |
POST | /lists/{list_uuid}/items/{uuid}/complete | Marks an item as purchased (moves from purchase to recently). |
POST | /lists/{list_uuid}/items/{uuid}/remove | Removes an item from the list. |
POST | /lists/{list_uuid}/notify | Sends a push notification to all list members. Body: {"notification_type": 1/2/3/4}. Types: 1=“Sto facendo la spesa”, 2=“Ho finito la spesa”, 3=“Ho aggiornato la lista”, 4=“Articoli urgenti aggiunti”. |
GET | /health | Returns {"status": "healthy", "session_active": true/false}. |
Item structure
Bring! items have three fields:
item_id— the product name, e.g."tomatoes"specification— the quantity/unit, e.g."500g","2 pieces"uuid— the unique ID assigned by Bring! (needed for updates, not for inserts)
When adding a new item, you don’t provide a uuid — the server assigns one. When updating, you must provide the uuid to identify which item to modify.
Step 3: Install and configure n8n
Set up n8n
n8n is an open-source workflow automation tool that allows you to connect various applications and services to automate repetitive tasks without manual intervention. It provides a visual interface where you can design workflows by linking different nodes that represent actions, triggers, or data processing steps.
I installed it in a Proxmox LXC by using the helper script provided by Community-Scripts: this is a very useful Community with many script that will help you many times: if you like them, consider donating to support Angie, tteckster’s wife - the founder and best supporter of the community - too early passed away.
Step 4: Set up the OpenAI API
The workflow uses GPT-4O-MINI for ingredient extraction and GPT-4O for the shopping list reconciliation. If you don’t already have an OpenAI API key, read the accordion below, but feel free to choose any other LLM provider supported by n8n (Anthropic, Cohere, Google Gemini, Hugging Face, etc.) — the workflow is provider-agnostic.
Set up the OpenAI API
We will use a GPT LLM to process unstructured data. You can choose other AI LLMs, but regardless of which one you use, to call it from another piece of software (like n8n) you need an authorised API key. Here are the steps to create one with OpenAI:
1. Create an OpenAI Account
- Sign Up or Log In: If you don’t already have an OpenAI account, go to OpenAI’s website and sign up. If you already have an account, simply log in at OpenAI Login.
2. Access the API Dashboard
- Go to the API section: After logging in, navigate to the OpenAI API dashboard. You can find this by going to OpenAI Platform Dashboard.
3. Generate an API Key
- Create a New API Key:
- Once you’re in the API keys section, click on “Create new secret key” or “Create new API key”.
- OpenAI will generate a new API key for you. This key is the API token you’ll use to authenticate requests to the OpenAI API.
- Copy the Key: After the key is generated, copy it immediately because it will not be shown again for security reasons.
4. Store the API Key Securely
- Secure Storage: Store the API key in a safe place, like a password manager.
5. Monitor Usage and Billing
- Monitor API Usage: OpenAI provides detailed usage analytics on your dashboard. You can monitor the number of tokens you’ve used and manage your spending.
- Manage Quotas: If needed, you can set limits or alerts for your API usage to avoid unexpected charges.
Step 5: Create the automation flow
This n8n workflow handles two trigger paths:
- Webhook — triggered by the Siri Shortcut (Cookidoo → Bring! sync)
- Telegram Trigger — triggered when a recipe is shared on the Telegram channel (same as V1)
Here’s the full workflow:
Workflow Description
The workflow is organized in three logical sections, visible as sticky notes in the editor:
- Telegram Part — processes content received through Telegram (text, links, images, PDFs), almost identical to the V1 version of this use case
- Cookidoo Part — retrieves and purges the Cookidoo shopping list
- Bring! Part — reconciles and updates the Bring! shopping list
0. Context setup (node: Set SourceTrigger and List ID)
Before any processing begins, this Code node runs for every trigger and sets two values that are used by every subsequent node:
sourceTrigger:"Webhook"or"Telegram"— determines which processing path the data follows. It’s set to"Webhook"by default and changed to"Telegram"only when amessagefield is present in the input.listID: the Bring! list UUID ([UUID]— replace with your own). This identifies which shopping list to read/update.
var sourceTrigger = 'Webhook';
const listID = '[UUID]';

if ($input.first().json.message) {
  sourceTrigger = 'Telegram';
}

return $input.all().map(i => ({ json: {
  ...i.json,
  sourceTrigger: sourceTrigger,
  listID: listID
}}));
Since both values are propagated to every item via $input.all().map(), they’re available in every downstream node — for example, the Bring! endpoints use {{ $('Set SourceTrigger and List ID').item.json.listID }} to build the correct URL.
1. Trigger nodes
Webhook (node: Webhook)
- Listens on
http://[FastAPI_IP]:[port]/webhook/grocery-sync - Authentication: Header Auth with an API key (
n8n-API-Keycredential) - Returns immediately to the Shortcut (async processing)
- Sets
sourceTrigger = "Webhook"in the data context
Telegram Trigger (node: Telegram Trigger)
- Monitors all interactions with the bot using
[Telegram_Token] - When a message arrives, sets
sourceTrigger = "Telegram"and passes the message data - You must deactivate the Telegram Trigger before testing in the n8n editor, otherwise active conversations will intercept test executions
2. Router (node: If Webhook)
An IF node checks sourceTrigger:
- If
"Webhook"→ routes to the Cookidoo Part - If
"Telegram"→ routes to the Authorization check
3. Authorization (nodes: Call 'Telegram BOT Authorization', Check authorized users)
- The Execute Workflow node calls a sub-workflow (
Telegram BOT Authorization) that checks if the user/chat is authorized. I’m not going to detail the sub-workflow here, but you can refer to it in the V1 version of this use case: since then I moved the authorization logic to a separate workflow to make it reusable in other workflows; maybe I will talk about it in a future post. - Returns
{ authorized: true/false } - The IF node routes:
- True →
Get content type(Telegram processing continues) - False →
Unauthorized reply→Leave chat
- True →
4. Telegram processing (nodes: Get content type, Open link, Get message text, Get PDF Content, Get original Telegram image)
Get content type is a Switch node that routes by content type:
- link →
Open link(HTTP Request to fetch the page) - img →
Get original Telegram image(merge to pass binary data forward) - text →
Get message text(Set node extractsmessage.text) - pdf →
Get PDF Content(extracts text from PDF)
Content Normalization: all paths converge on the same Merge Telegram items node, which collects the parsed content.
5. AI ingredient extraction (nodes: Extract ingredients from link, Extract ingredients from image, Extract ingredients from text)
Three Basic LLM Chain nodes, one per content type. Each uses:
- Model:
GPT-4O-MINIvia theOpenAI Chat Modelnode - Output Parser:
Structured Output Parserwith this schema:
{
  "type": "array",
  "items": {
    "type": "object",
    "properties": {
      "ingredient": { "type": "string" },
      "quantity": { "type": "string" }
    }
  }
}
The Link and Image prompts:
Extract the ingredients of the recipe and return them in a json
The Text prompt adds extra context to avoid misinterpreting single ingredients:
Extract the ingredients of the recipe and return them in a json; if it doesn't look like a recipe but a single ingredient, treat is as an such; if no quantity is specified, omit it
6. Cookidoo processing (nodes: Get Cookidoo Shopping List, Prepare Cookidoo items, Purge Cookidoo Shopping List)
Get Cookidoo Shopping List (HTTP Request):
- Method: GET
- URL:
http://[FastAPI_IP]:8001/shopping/ingredients - Returns an array of
{ name, description }items
Prepare Cookidoo items (Code node):
return [{
  json: {
    new_items: $input.first().json.items.map(item => ({
      ingredient: item.name
        .replace(/^di\s+/i, '')
        .toLowerCase()
        .trim(),
      quantity: item.description
    }))
  }
}];
Purge Cookidoo Shopping List (HTTP Request):
- Method: DELETE
- URL:
http://[FastAPI_IP]:8001/shopping/clear - Clears the Cookidoo list after syncing to avoid duplicates on the next run
7. Bring! processing (nodes: Get current Bring! items, Prepare Bring items, Merge New and Current items)
Get current Bring! items (HTTP Request):
- Method: GET
- URL:
=http://[FastAPI_IP]:8002/lists/{{ $('Set SourceTrigger and List ID').item.json.listID }} - Query Parameters:
only_purchase = true - Options:
allowUnauthorizedCerts = true(Bring! uses a self-signed cert internally) - Returns
{ purchase: [{ item_id, specification, uuid }, ...] }
Prepare Bring items (Code node):
return [{
  json: {
    existing_items: $input.first().json.purchase.map(item => ({
      ingredient: item.item_id
        .replace(/^di\s+/i, '')
        .toLowerCase()
        .trim(),
      quantity: item.specification,
      uid: item.uuid
    }))
  }
}];
Merge New and Current items (Merge node):
- Combines three inputs: Cookidoo items (from Prepare Cookidoo items), Bring! existing items (from Prepare Bring items), and Telegram extracted items (from Prepare Telegram items)
- Uses
combineByPositionmode withincludeUnpaired = true
The result of the merge is a single JSON object with two arrays passed downstream:
{
  "existing_items": [ { "ingredient": "tomatoes", "quantity": "500g", "uid": "abc123..." } ],
  "new_items":     [ { "ingredient": "spaghetti", "quantity": 500 } ]
}
This object becomes the input for the AI reconciliation step.
8. AI reconciliation (node: Manage Shopping List)
A Basic LLM Chain node with GPT-4O (not mini — this requires more reasoning) that receives the merged JSON described above and produces:
The prompt is:
NOTE
The prompt in the workflow JSON is in Italian — this is intentional and consistent with other articles on this blog. The English translation below is for reference only.
You are an agent specialized in food ingredient reconciliation.

You will receive a JSON containing:
* existing_items: ingredients already present in a list
* new_items: ingredients coming from a new recipe

Objective:
1. Normalize ingredient descriptions.
2. Identify ingredients that represent the same product.
3. Sum quantities when possible (for different units of measure try the conversion, e.g. ml to g, considering that different foods can have different densities).
4. Produce output divided into:
   * updates
   * inserts

Normalization rules:
* Ignore differences in uppercase/lowercase.
* Ignore articles and non-significant words.
* Handle singular/plural.
* Handle common synonyms.
* Normalize units of measure.
* Keep a canonical description.

Matching rules:
* Two ingredients must be considered equal if they clearly represent the same food.
* If an element in new_items matches an element in existing_items, generate a record in updates using the existing element's uid.
* If there is no match, generate a record in inserts.

Ingredients to always ignore:
* water, still water, sparkling water, ice

Spices and seasonings:
Ignore salt, pepper and other spices when the quantity is vague or negligible (q.b., qb, as needed, a pinch, a grip, a teaspoon, half a teaspoon).
Keep spices instead when the quantity is expressed in grams, kilograms, milliliters or other meaningful units.

Output:
Return exclusively a valid JSON with the structure:
{
  "updates": [],
  "inserts": []
}

For new elements return: description, quantity
For those to update: uid, description, quantity
In the description keep the first letter capitalized.

Do not add explanations or text outside the JSON.
9. JSON parsing and Bring! API calls (nodes: Parse JSON, Updates, Inserts, Update item, Insert new item)
Parse JSON (Code node):
const data = JSON.parse($input.first().json.text);
return [{
  json: {
    updates: data.updates || [],
    inserts: data.inserts || []
  }
}];
Updates / Inserts (Split Out nodes):
- Split the
updatesandinsertsarrays into individual items
Insert new item (HTTP Request):
- Method: POST
- URL:
http://[FastAPI_IP]:8002/lists/{{ $('Set SourceTrigger and List ID').item.json.listID }}/items - Body Parameters:
item_id:={{ $json.descrizione }}specification:={{ $json["quantità"] }}
Update item (HTTP Request):
- Method: POST
- URL:
http://[FastAPI_IP]:8002/lists/{{ $('Set SourceTrigger and List ID').item.json.listID }}/items/{{ $json.uid }}/update - Body Parameters:
specification:={{ $json["quantità"] }}item_id:={{ $json.descrizione }}
Step 6: Configure the Siri Shortcut
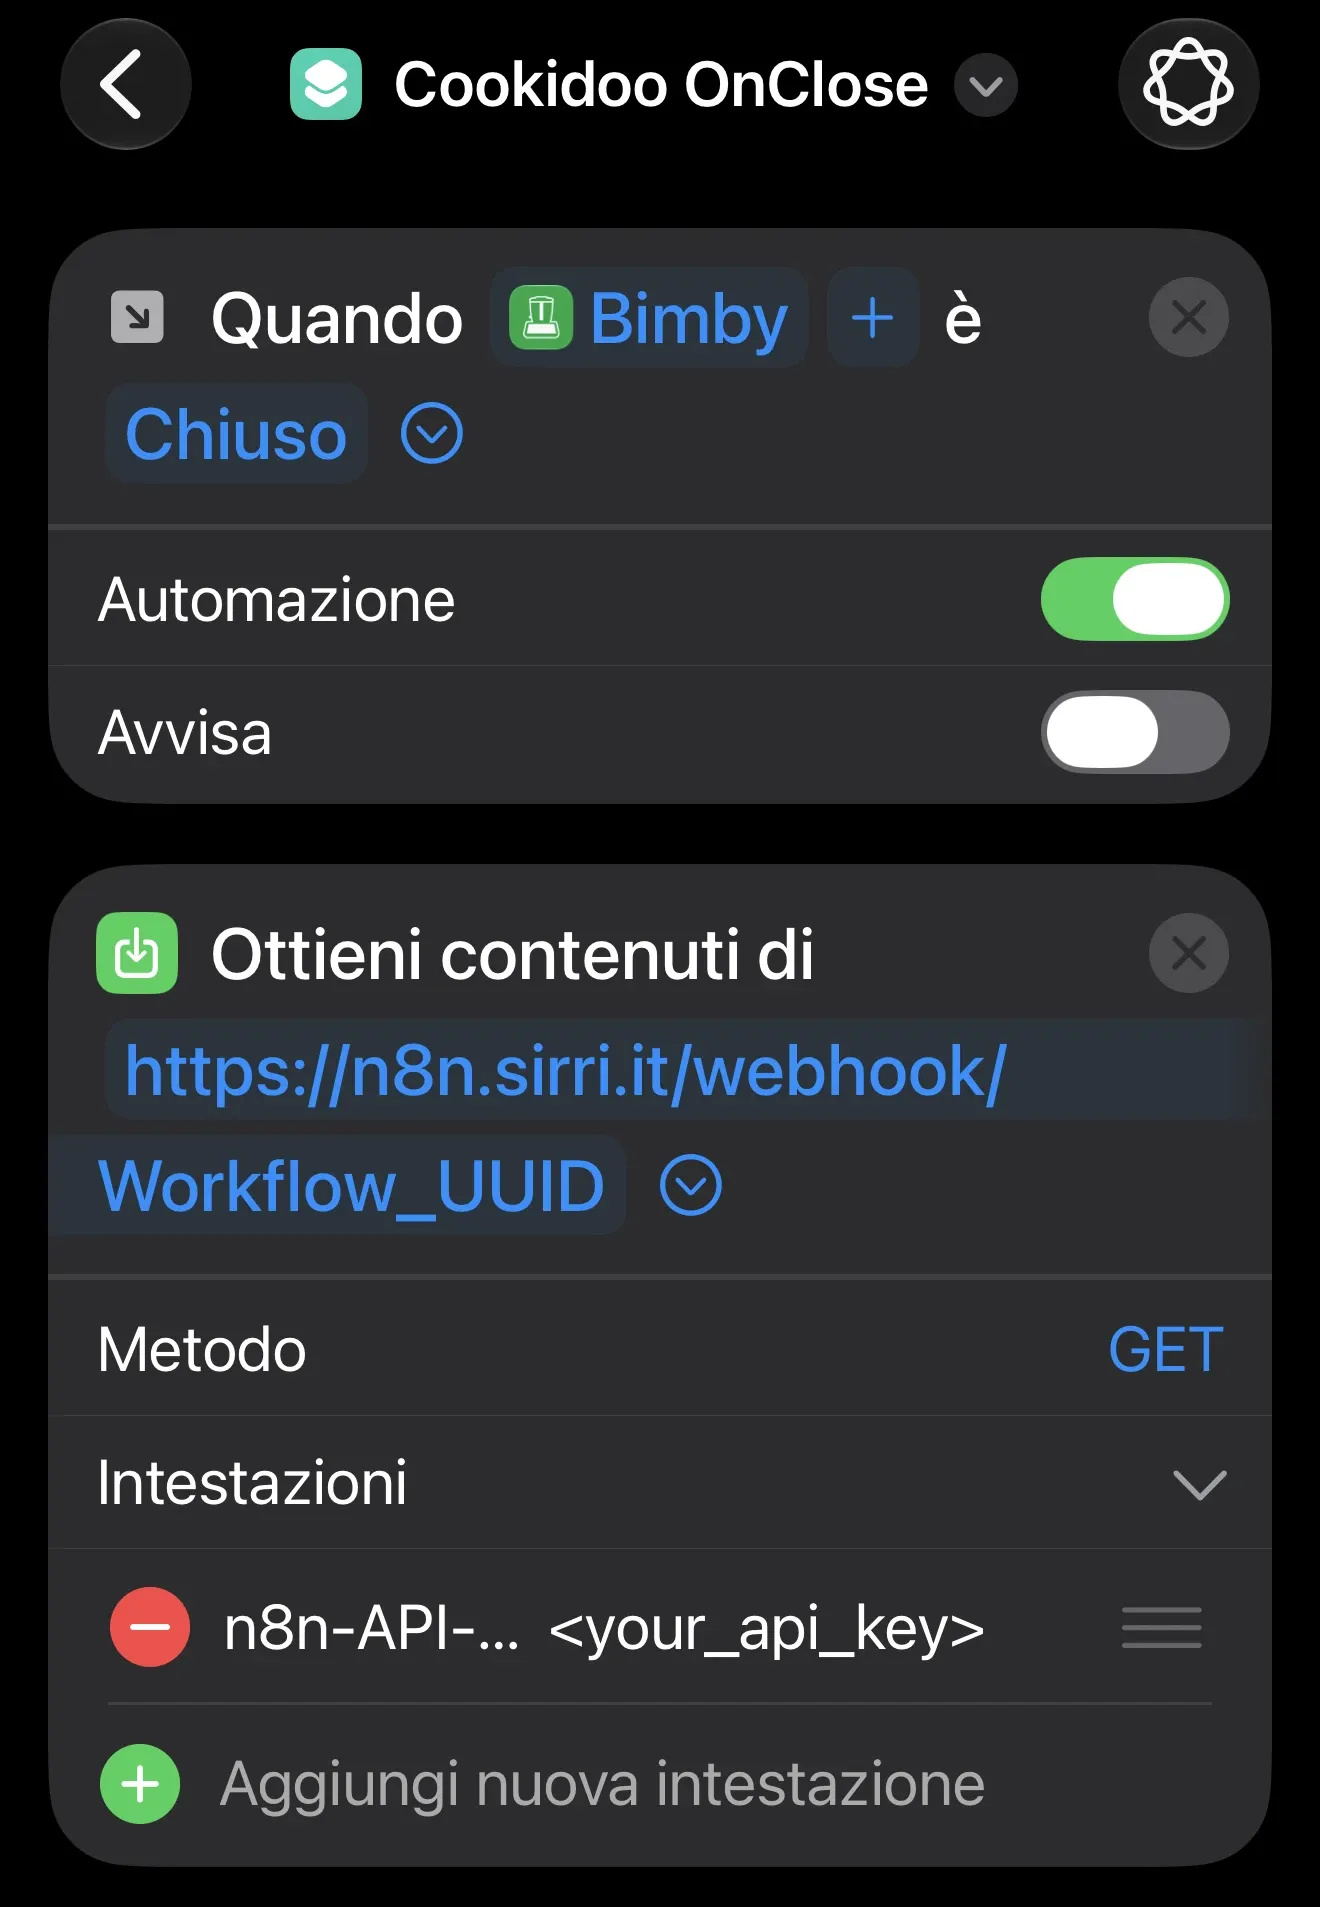
Instead of polling the Cookidoo list every few minutes from n8n, I decided to trigger the workflow as soon as I close the Cookidoo app on my iPhone: in this way, the Bring! list is updated almost in real-time with the latest Cookidoo shopping list.
On your iPhone, open the Shortcuts app and create a new Automation:
Triggers:
- When Cookidoo App is closed
Actions:
- Get contents of URL with these settings:
- URL:
http://[n8n_endpoint]:[port]/webhook/[workflow_UUID] - Method: GET
- Headers:
n8n-API-Key: <your_api_key>
- URL:
For security reasons, the webhook is authenticated via the n8n-API-Key header. In n8n, the Webhook node uses Header Auth with the credential named n8n-API-Key — you need to create this credential in n8n with the same API key you use in the Shortcut.
Since the HTTP request is sent from the iPhone, you need to make sure that the n8n endpoint is reachable from outside your local network. The simplest approach is to run n8n over Tailscale (or any similar mesh VPN); alternatively, you can use a reverse proxy or tunneling service.
You can also add the Shortcut to your Home Screen or ask Siri to run it by the name you gave it: this can be useful if you want to update the Bring! list without opening the Cookidoo app, for example when you used the Cookidoo app directly on your robot.
Step 7: Choose what to cook tomorrow
Now you can use the Cookidoo app on your iPhone to browse recipes, add them to your shopping list, and when you close the app, the Bring! list will be updated with the latest ingredients. And if someone sends you a recipe link, an image, or a PDF via Telegram, the workflow will also process it and update the Bring! list accordingly, by updating quantities for existing ingredients and adding new ones. Many sources, one single shopping list at your wrist — no more duplicates, no more missing ingredients, no more confusion.
Step 8: Enjoy
If this trick has been useful to you, keep scrolling down and consider supporting me by clicking that beautiful blue button! 😅